Howto: 2000 Stereo Replacement
#1
 07-19-2009, 03:19 PM


Here's a round up of my recent experience
- replacing the stock
- 2-DIN Delco/Toyota AD6803 receiver/CD/cassette stereo in my
- 2000 SR5 3.4L 4Runner with a
- 1-DIN Clarion DXZ385USB stereo and a
- 1-DIN Metra 88-00-8000 pocket using
- Metra's 70-1762 wiring harness adapter.
Before we get started, make sure you have all of the info you need to disable your car alarm. You are about to need it. Then, take the safety precaution of removing the negative battery cable from the battery. There's nothing that ruins a day like getting popped in the face by an accidentally-triggered air bag. You will need the car alarm stuff when you hook the cable back up. Be ready!
Okay ... ready to swap the stereos.
I begin by doing the harness attachment in a nice cool place, like on my kitchen table. Using the color-coded wiring, it's pretty easy to them match up from the stereo wiring to the harness adapter. You will have a few extra wires left over, on both ends, but don't worry about it. Just cap them off so they can't short out and let them dangle.
I do my wiring by stripping a little off the wire ends, twisting them together really good, then slipping a little heat shrink tubing over the connection and shrinking it down. This give me an excellent, sturdy connection and saves me the trouble of soldering. If anyone sees a downside, lemme know.

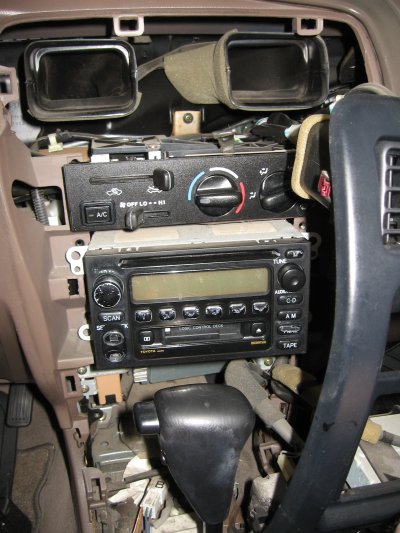
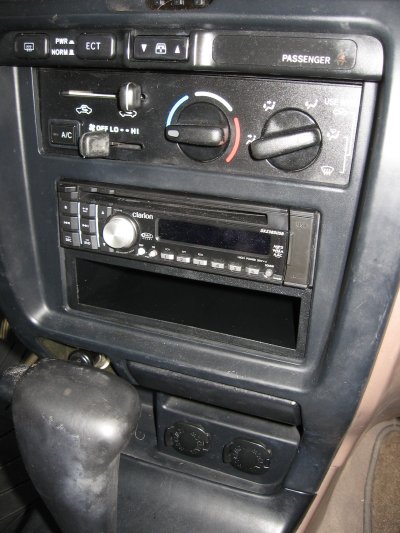
Once the wiring has been done, it's time to move out to the vehicle. The only tool you will need is a phillips head screwdriver for the stereo retaining screws. Here's the original center panel:
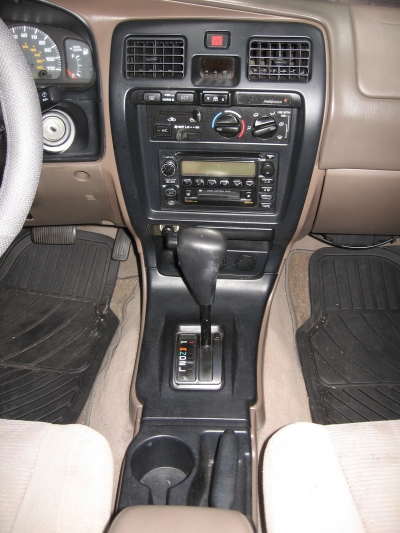
There are 3 pieces to the panel covering that need to be easily removed in the order shown here. They are attached to the interior framework by simple pressure clips, and easily pop off using only your fingers.
Open the console storage lid, pull the emergency brake handle back a few clicks, grab the cup holders and the brake slot and pop off the first panel cover starting in the console storage area and working towards the front. There are 4 clips:

Then the section under the shifter. Just start from the open end and work toward the front/top. There are 4 more clips:

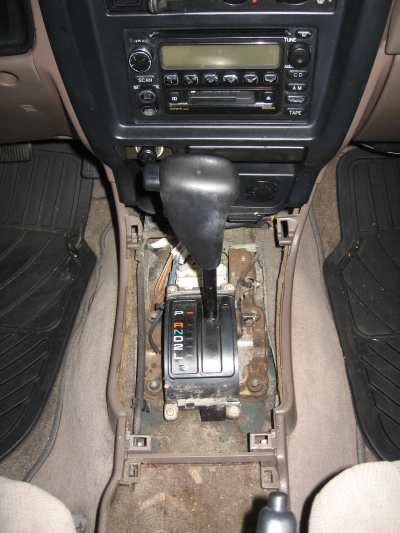
Then the big panel cover. There are 8 clips: 3 on each side and two on top. Just work your way from the bottom to the top and don't yank on them. They'll pop off easily. Keep the wiring attached as you gently pull the panel cover away and to the right to get access to the stereo:
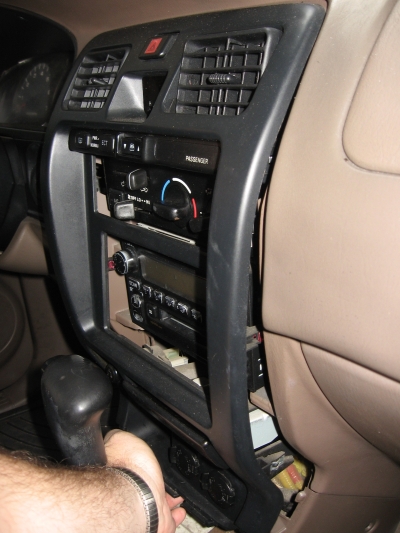
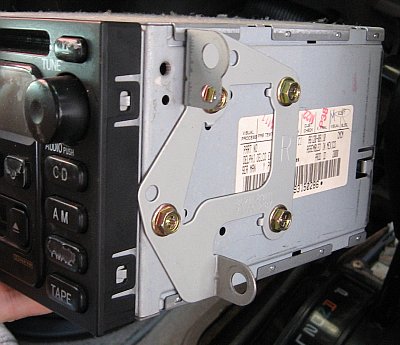
There are 4 screws holding the stereo on to the center panel, two on each side. I find it's a good idea to keep a magnet-on-a-stick handy for when the screws fall into the console. Remove the 4 screws, and pull the stereo out of the console:
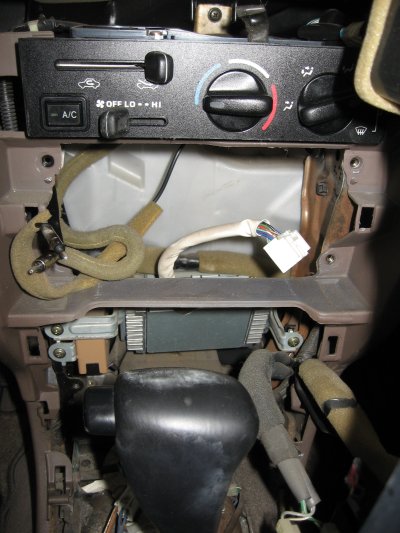
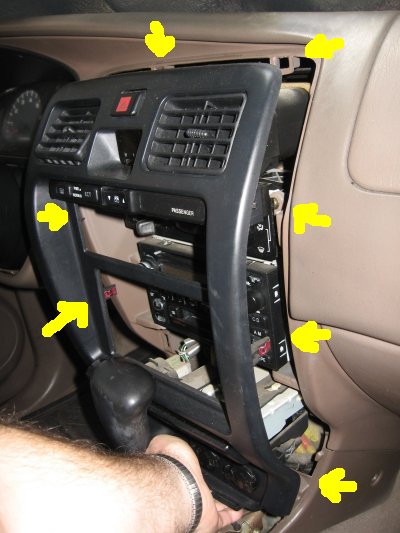
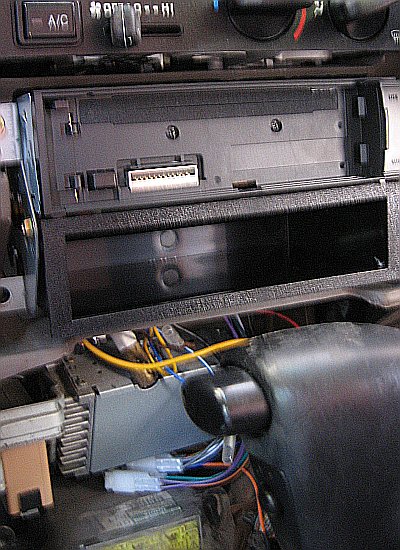
NOTE: The stereo connects to the stock amplifier, shown in the second image, above, below where the stereo was. You can see the single plug from the amp to the stereo, as well as the larger front fender antenna plug and the smaller rear window antenna plug in their khaki sheathing. The 2 plugs I need for my wiring harness adapter are plugged into the bottom of the amplifier. These are all simple clip-release plugs with a little clip to push down on on top, then slide the plug out:
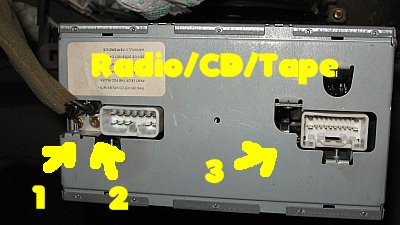

#1 is the front fender antenna connector, #2 is the rear window antenna connector, #3 is the plug between the amp and the stereo, #4 are the plugs bypassing the amp that I will use with my harness adapter, and #5 is the AIR BAG CONTROLLER!!! Try not to mess with it. Run the harness adapter over the metal bar, like the old cable (#3), and plug it into the bypass plugs (#4). Connect the other end of the harness adapter to the Clarion, and also attach the front fender antenna plug. Ignore the rear window antenna. You can remove the amp, if you want to. I didn't.
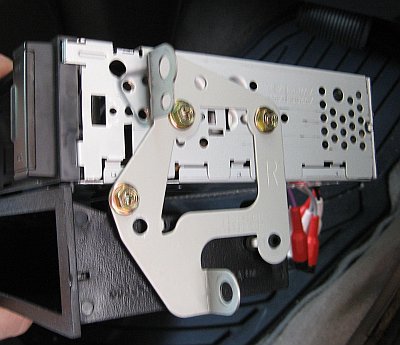
Once the new stereo and pocket are attached to the original brackets taken from the old stereo, screw the package back into the console, and replace the panel covers in reverse order of the above instructions.
I did not need the metal bracket that came with the Clarion nor did I use the trim ring.
I hope this is helpful to others, like me, who always manage to get that ONE vehicle that is not exactly like the one in the manual. Have fun!
- replacing the stock
- 2-DIN Delco/Toyota AD6803 receiver/CD/cassette stereo in my
- 2000 SR5 3.4L 4Runner with a
- 1-DIN Clarion DXZ385USB stereo and a
- 1-DIN Metra 88-00-8000 pocket using
- Metra's 70-1762 wiring harness adapter.
Before we get started, make sure you have all of the info you need to disable your car alarm. You are about to need it. Then, take the safety precaution of removing the negative battery cable from the battery. There's nothing that ruins a day like getting popped in the face by an accidentally-triggered air bag. You will need the car alarm stuff when you hook the cable back up. Be ready!
Okay ... ready to swap the stereos.
I begin by doing the harness attachment in a nice cool place, like on my kitchen table. Using the color-coded wiring, it's pretty easy to them match up from the stereo wiring to the harness adapter. You will have a few extra wires left over, on both ends, but don't worry about it. Just cap them off so they can't short out and let them dangle.
I do my wiring by stripping a little off the wire ends, twisting them together really good, then slipping a little heat shrink tubing over the connection and shrinking it down. This give me an excellent, sturdy connection and saves me the trouble of soldering. If anyone sees a downside, lemme know.
Once the wiring has been done, it's time to move out to the vehicle. The only tool you will need is a phillips head screwdriver for the stereo retaining screws. Here's the original center panel:
There are 3 pieces to the panel covering that need to be easily removed in the order shown here. They are attached to the interior framework by simple pressure clips, and easily pop off using only your fingers.
Open the console storage lid, pull the emergency brake handle back a few clicks, grab the cup holders and the brake slot and pop off the first panel cover starting in the console storage area and working towards the front. There are 4 clips:
Then the section under the shifter. Just start from the open end and work toward the front/top. There are 4 more clips:
Then the big panel cover. There are 8 clips: 3 on each side and two on top. Just work your way from the bottom to the top and don't yank on them. They'll pop off easily. Keep the wiring attached as you gently pull the panel cover away and to the right to get access to the stereo:
There are 4 screws holding the stereo on to the center panel, two on each side. I find it's a good idea to keep a magnet-on-a-stick handy for when the screws fall into the console. Remove the 4 screws, and pull the stereo out of the console:
NOTE: The stereo connects to the stock amplifier, shown in the second image, above, below where the stereo was. You can see the single plug from the amp to the stereo, as well as the larger front fender antenna plug and the smaller rear window antenna plug in their khaki sheathing. The 2 plugs I need for my wiring harness adapter are plugged into the bottom of the amplifier. These are all simple clip-release plugs with a little clip to push down on on top, then slide the plug out:
#1 is the front fender antenna connector, #2 is the rear window antenna connector, #3 is the plug between the amp and the stereo, #4 are the plugs bypassing the amp that I will use with my harness adapter, and #5 is the AIR BAG CONTROLLER!!! Try not to mess with it.
Run the harness adapter over the metal bar, like the old cable (#3), and plug it into the bypass plugs (#4). Connect the other end of the harness adapter to the Clarion, and also attach the front fender antenna plug. Ignore the rear window antenna. You can remove the amp, if you want to. I didn't.Once the new stereo and pocket are attached to the original brackets taken from the old stereo, screw the package back into the console, and replace the panel covers in reverse order of the above instructions.
I did not need the metal bracket that came with the Clarion nor did I use the trim ring.
I hope this is helpful to others, like me, who always manage to get that ONE vehicle that is not exactly like the one in the manual. Have fun!
Last edited by Stupidscript; 07-19-2009 at 08:28 PM. Reason: Swapped photos
#2
07-19-2009, 03:49 PM

Good Article - thanks for the detailed coverage
Re your invitation regarding the wiring: The mechanical connection you made by twisting the wires and using heat shrink (without solder) is interesting. Do you have any concerns about skin oils or salts introducing oxides that could introduce resistance into the electrical connection? Solder (with its rosin) flushes the connection of such impurities and ensures the contact is not only mechanically solid but electrically optimal (over the long term as encased in the metal). Since you invited input on this point I thought I would surface the question. I also think the Extent of detail and photo documention you used is excellent. I too am interested in changing out the stock radio in my 4Runner for an upgraded unit with Bluetooth capability and better audio characteristics so your article was timely ... so how's the new sound?
Emale
#3
07-19-2009, 04:09 PM
You point out the exact issues I considered by using the twist-and-shrink method instead of soldering. Yes, skin oils will introduce small amounts of both resistance and potentially corrosive elements. Using vinyl gloves while working with the wires eliminates the issue, but other oxidization elements would still be present in tiny amounts, and, as you noted, using flux prior to soldering would remove those impurities. I simply do not know how a couple of decades will affect the connections, frankly. Hopefully I won't need to pull them and rewire, but it should be easy enough, when I need to. It's probably a 15-minute job.
I do agree that soldering would be the best for the very long term.
The new sound is quite good The Clarion's internal amp pushes 50x4 watts, and is very clean. I had ordered a Bluetooth unit, but got the DXZ instead. The distributor offered me $60 back if I kept the DXZ, and I only paid $68 in a clearance sale, so I figured I could keep using my Bluetooth headset for awhile for that kind of deal. The DXZ has a USB port and an AUX jack on the front panel, and is set up for controlling my wife's iPod plugged into the USB. It's got a remote control, and is satellite- and 6-channel-ready, too. Among other stuff. Woohoo!
I did the replacement because the CD on the old unit stopped playing CDs. So there is a mild improvement in audio quality, probably due to the new, clean circuitry, but now I don't have anything to play my cassettes on ...
 No more Harmonicats!
I do agree that soldering would be the best for the very long term.
The new sound is quite good The Clarion's internal amp pushes 50x4 watts, and is very clean. I had ordered a Bluetooth unit, but got the DXZ instead. The distributor offered me $60 back if I kept the DXZ, and I only paid $68 in a clearance sale, so I figured I could keep using my Bluetooth headset for awhile for that kind of deal. The DXZ has a USB port and an AUX jack on the front panel, and is set up for controlling my wife's iPod plugged into the USB. It's got a remote control, and is satellite- and 6-channel-ready, too. Among other stuff. Woohoo!
I did the replacement because the CD on the old unit stopped playing CDs. So there is a mild improvement in audio quality, probably due to the new, clean circuitry, but now I don't have anything to play my cassettes on ...
No more Harmonicats!
Last edited by Stupidscript; 07-19-2009 at 08:21 PM. Reason: Corrected stereo specs
#4
09-04-2009, 08:09 PM
My 4Runner originally came with the Toyota AD6803 (a.k.a. Delphi Delco 09357129) CD/cassette/AM/FM stereo that had a diversity antenna setup that used both the normal-sized front fender antenna plug and the smaller-sized rear window antenna plug.
In the above installation howto, I only plugged in the normal-sized front fender antenna because the Clarion HU only has the one normal-sized jack.
But reception kind of stunk, so I wanted to hook up both antennas. Here's what I used, with everything fitting perfectly and improving the reception greatly:
Metra 40-UV43 Y-cable = $3.00 from Amazon
Metra 40-GM10 adapter = $13.00 from Fry's, but lots of places have it online
The Y-cable has 2 normal-sized female jacks going to 1 normal-sized male plug.
The adapter has 1 smaller-sized female jack going through a 10" piece of coax to 1 normal-sized male plug (at a 90 degree angle .. doesn't matter).
The front fender antenna plug goes into one of the Y-cable's normal females, the smaller rear window antenna plug goes into the adapter's small female jack, and the adapter's normal-sized male end goes into the other normal female in the Y-cable. Finally the Y-cable's normal male plug goes into the Clarion's single normal-sized female jack:
1) normal front antenna => Y-cable female A
2) small rear antenna => adapter => Y-cable female B
3) Y-cable normal male => Clarion head unit female
There's another adapter out there, the Scosche MDAB which is a $5 jack-to-plug unit without any cabling, that looks like it would work instead of the jack-to-cable-to-plug Metra GM adapter, but I couldn't find it in a store, and the shipping would be more than the unit, so I went with the Metra adapter. Any small-to-normal adapter for a 1988+ GM would probably work, though. Make sure you get the right one ... there are also "reverse" products that make a normal plug fit into a small GM jack ... not what you need.
The "diversity antenna" setup requires two receivers in addition to the two antennas (or x receivers for x antennas, actually), and the Clarion does not provide that mechanism like the Delphi Delco unit did, so in effect I have just made a bigger antenna instead of installing a true diversity antenna system. If anyone has any info on the exact nature of the diversity setup in a 2000 SR5 4Runner I'd love to hear about it.
Enjoy!
Last edited by Stupidscript; 09-04-2009 at 08:18 PM.


#7
08-26-2011, 01:26 AM

Who know, is there any difference in installation with mine 4Runner 2000 Limited and SR5? Can I also use Metra's 70-1762 wiring harness adapter or I need something else?
I'm planning to install Pioneer DEH-P700BT (removed from my old car), which is 1DIN and uses ISO connector.
Thanks!
PS. Sorry for my English, I'm not native speaker.
I'm planning to install Pioneer DEH-P700BT (removed from my old car), which is 1DIN and uses ISO connector.
Thanks!
PS. Sorry for my English, I'm not native speaker
.

#9
09-09-2013, 12:47 PM

I just wanted to thank you for your clear instructions and diagrams, My cd quit to and I e/bayed a factory radio for $35, with your help it took less than 20 minutes to install. My only question is what is the plug by the twin antenna ports, My guess a cd changer? Thanks.


